Thrift Store Find - Jewelry Box Makeover


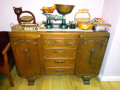
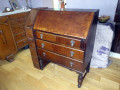
A few days ago at Goodwill, I purchased an old wooden jewelry box. I had been wanting one for a while but I didn't want to purchase one brand new. I wanted something that was used and in good condition. Something that I could refurbish myself and this one was perfect. I am so glad I found it! It's a decent size with one large drawer on the bottom and two smaller drawers on top. I noticed after I got it home that there were apparently two swinging doors mounted on it at one time and the two smaller drawers on top used to be behind a cabinet which is now missing. Still it was barely noticeable and I knew I could do something with it. It was in pretty good condition with no damage except a few minor scratches here and there. I actually didn't mind the minor scratches and flaws because I knew that with the look I was going for, the small imperfections would add charm and character. One of the main things I love about it is the lining inside the drawers is a bright pink (which I love!) and completely in tact. I couldn't wait to get started on it!

Supplies
- Sandpaper, fine and heavy grit
- X-acto knife
- E6000 glue
- Pliars
- Clothespins
- Anita's metallic black acrylic paint
- Silver Leaf glaze by Plaid
- Krylon Clear Coat
- Purchased glass drawer knobs
- 10 in x 1 3/4 in strip of wallpaper
- Mod Podge


Step One - Remove Hardware
When refurbishing a jewelry box, the first thing I would normally do is remove all the hardware so I removed a few small brass colored brackets and some metal pieces that were left from the missing cabinet. I really didn't like the drawer pulls but they were mounted in such a way that I felt like I would have to damage the lining to remove them and the lining was in such pristine condition I didn't want to take a chance at ruining it so I decided to just leave them and do my best to sand and paint around them.
As I was painting, I kept thinking more and more about how much I really did not like the drawer pulls. They were just drab and dated and I kept thinking about all of the other styles that would look fabulous with it. I just couldn't stand the thought of doing all this work and not liking one of the most important details on the jewelry box. It really wouldn't have been a true makeover then! I put my thinking cap on and got to work.
The challenge was to get the drawer pulls off without destroying the lining . So I took an X-acto knife and a pair of needle nose pliers and carefully separated the pink covered chipboard lining from the wood. When I Iooked down inside, I noticed the drawer pulls were mounted with a flimsy sort of brad so I carefully pulled each of the brads out using the pliers. I did this with each drawer and then put lots of E6000 glue down in between the covered chipboard lining and the wood. I then used clothespins to clamp and hold the lining tightly up against the wood while the glue dried overnight. It worked like a charm and the lining still looked great!
After that I put some polymer clay to fill in the holes on the top two drawers where the hardware was and it filled them in nicely. Also, there were two holes right above the bottom drawer where the hardware was mounted for the missing cabinet. I still needed to cover them but I decided to wait and fix that last.

Step Two - Sand
After removing the hardware, it was time to sand. Even though I did it backwards, I'm still listing the steps in order. I sanded the whole outside and each one of the drawer facings and around the whole jewelry box itself. I used a fine grit and heavy grit sand paper. The surface of the wood was very,very smooth and it was actually kind of hard to sand but I managed to sand it just enough. Once I was done with sanding all the pieces, I made sure to get all the loose dust off of the jewelry box. I thought it was so cute that my 3 year old son Devin was determined to help me with the sanding so I gave him some sandpaper and let him go to town :)


Step Four - Paint and Seal
The next thing to do was paint. The picture that I had in my mind was a painted silver jewelry box. Lately I've seen lots of refurbished wooden furniture painted silver and it looks fantastic so that was the look I was going for. I started to paint it silver but when I applied just the silver acrylic paint, it was kind of sheer so I decided to go ahead and paint it all black first. I painted it black instead of white because I wanted the undertone to be more of a dark gray than a lighter color. I applied two coats of black paint to all the pieces. Once it was a fairly good solid color of black, I sanded it again but just a bit. It was a very light sanding. Some places I sanded with more pressure and some just very lightly.
This is when I took off the hardware.. I'm glad that I changed my mind and to ok them off even though I had to backtrack a little, it turned out to be a great choice. Of course, I had to re-sand and paint again but just a little and then I was back on track. After the jewelry box was fully painted the way I wanted it, I went over it with a few coats of Krylon clear coat to seal and protect the painted finish.

Step Five - Mount Hardware
Now that the jewelry box was painted and sealed, it was time to mount the super cute knobs that I purchased on Ebay. I had already decided that I wanted some clear acrylic or even glass knobs, hopefully some that had a vintage look to them and that is EXACTLY what I found! I was nervous at first thinking that knobs may be a bit too big for it and may look out of proportion but I couldn't find anything much smaller so I decided to go with them.
The knobs were very easy to install. I drilled the holes so that I could mount the knobs but I did have one small problem. They were made for cabinets or drawers that are half inch to an inch thick and the wood I was mounting them on was only about a quarter of an inch thick so I had to use the Dremel to cut some of the length of the screws. Once that was done, the knobs were mounted firmly and I think they look great!


Step Six - Conceal the Holes
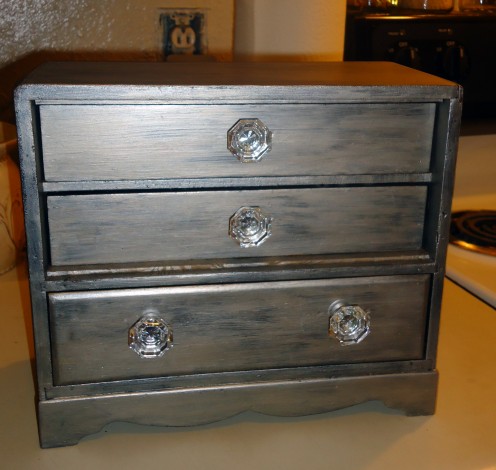
Painting and hardware are done, on to the last challenge! There were two holes that were left after the removal of the original hardware right under the second drawer (see in the photo) and I needed to find a way to conceal them. I decided that after everything else was done, I would glue on a row of crystals in such a way that they would hide the holes. However, I realized that in order for that to work I would have to cover the holes first with paper, then paint and then glue on the crystals. I decided just to cover the two holes using a strip of old, off white embossed wall paper I had been saving for years. I cut it into a strip that was 1.75 in x 10 inches, applied Mod Podge on the back and completely covered the whole platform under the second drawer. I then painted it with a coat of black and then the silver glaze and viola, no more holes! I think it turned out beautiful!


")

The jewelry box didn't end up having a perfectly smooth finish like some of the other silver painted wooden furniture I've seen. I decided to let the imperfections work for me and painted it to look sort of shabby chic. I purposely used a stiff brush to create some brush lines here and there. At first I thought it may look tacky, but I actually am very happy with the finished product!
Thanks so much for stopping by and reading my jewelry box makeover hub!