How To Make a Polymer Clay Pendant

Polymer clay is very easy to work with and it makes great finished jewelry pieces. You may be wondering what exactly polymer clay is. Polymer clay is a kind of modeling clay that can be baked in a toaster or home oven to be hardened rather than having to go through the lengthy process of being fired in a kiln. It actually contains plastics so once hardened it is very durable and almost ceramic-like. I recently made some necklace pendants from polymer clay and they were super easy to make and the clay itself is fairly inexpensive. I bought mine at Hobby Lobby but you can find it at pretty much any craft supply store. I think they even have it at Wal-Mart. It comes in different colors and brands. I bought three small squares- two of which were Sculpey brand in a white color and the other Fimo brand in black. They all worked really well for me. One thing I want to touch on is that I had a bit of a time finding a sealer that would work... please be sure to see my note at the end of the tutorial about sealers.
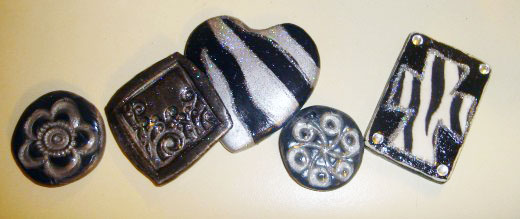
I'm excited to share with you how I made these pendants!
Supplies Needed:
- Polymer Clay
- Things to shape your clay-small cookie cutters, pill bottles without lids, small molds etc..
- Toaster Oven or Home Oven (a toaster oven designated for clay use only is preferable)
- Rubber Stamps (optional)
- Acrylic Paint (optional) since the clay comes in different colors- No spray paint
- Sealer: Diamond Glaze Dimensional Glue (please see note at end of page for other sealer options)
- Toothpick or similar tool to make your hole for jump ring
- Jump ring
Shape Your Clay
Start out by flattening your clay. I did this by tearing off a piece of the clay and flattening out slightly and evenly with my hand. I didn't want it too thin. After flattening it out, I took a medicine bottle without a lid and sliced into the clay like a cookie cutter and cut out some circles. Also, I had a purfume bottle top that was square that I used to cut into the clay. I used the lid to a small plastic heart container to do the heart. Just use whatever you have around. Because of fear that I wouldn't be able to pull the clay out of the mold without messing it up, I put plastic wrap over the mold and then push the clay down into the mold with plastic wrap underneath, making sure to pack it in really well then all I had to do was pull out the plastic wrap and the shape came out nice and neat. This is when I took some of my rubber stamps and stamped designs into some of them. The stamps worked well with the clay.
To make beads out of the clay just roll up some balls of whatever size you want. You can also stamp designs into your beads as well.
When you have all your pendant shapes and balls rolled just poke a hole through them and your ready to bake!
Pop It In The Oven!
Put your pieces on a flat surface like an old cookie sheet and bake your pieces according to the instructions that came with the clay. From what I've read it's best to use a toaster oven designated only for the purpose of baking clay rather than using an oven that you will be baking food in as well. However, I don't have a toaster oven so I did use my home oven and it worked fine without any ill effects- no harsh smells or anything like that. I did make sure to use an old cookie sheet that will not be used for food any longer.
Painting and Sealing Your Clay Pieces
If you want to paint your clay it's time to do that now. Make sure and use acrylic paint- no spray paint or enamel based paint. I used some black and silver paint Folk Art paint and painted the piece one color and tried to get the other color into the crevices of the stamped design to get that contrast of colors to help the design pop. I also sprinkled some glitter on a few of them. Cute!
After your paint is dry it's time to seal it. Sealing the clay was the tricky part for me.... as I found you can't use just any sealer on polymer clay especially not a sealer in a spray can. I eventually found that the Diamond Glaze that I had on hand worked but there are other options as well. See below the note about sealers.
Once your sealer is dry just put a jump ring through the small hole, string onto a necklace and your ready to go with your new polymer clay pendant!!
**Important Note About Sealers**
I learned through trial and error when trying to find a good sealer for the clay. First I used a spray sealer on my pieces which turned out horrible. They stayed tacky, no matter what I did so I had to sand it all off and start over. After researching the subject, I learned that apparently the petrolium-based solvents in spray cans eat at the clay and can cause it to remain tacky. Basically, I've read if it is water based and acrylic it will work fine.
Here is a list of sealers that have been mentioned to work good with polymer clay:
Rustoleum Varathane
Liquid Sculpey
Fimo Liquid Gel
Future Floor Wax
Clear Acrylic Nail Polish (not enamal)
Any water based varnish
Please visit http://glassattic.com/polymer/finishes.htm for a complete list of sealers/finishes.
Also, I want to add here that if your clay piece is already the color you want it to be (without having to paint) you can actually sand and buff your clay piece to a beautiful shine skipping the need for sealer! I thought that was awesome... I can't wait to try it!
This is just a simple tutorial about using polymer clay and really doesn't even touch the surface of possibilities of what you can do with this stuff. You can mix the colors to come out with a sort of swirly marbling effect, you can make faux turquoise and other stones, you can do crackling and antiquing affects, you can do image transfers onto your clay pieces and so much more! When doing my research I found http://glassattic.com. It is an intensive site with all kinds of information on polymer clay. I don't think there is one thing that isn't covered there. Please go and take a look. It is a huge source of information about polymer clay and what you can do with it.
Comments, Questions or Concerns?? Let me know!


