- HubPages»
- Arts and Design»
- Crafts & Handiwork»
- Jewelry Making
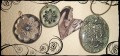
How To Make A Bottle Cap Pendant- Tutorial #2

I love working with used bottle caps to make pendants! I previously shared a hub tutorial on how to make bottle cap pendants here. But I've been experimenting and have come up with another version of the bottle cap pendant. These have the image mounted on the top of the cap instead of inside the cap. Also, I bend the edges out flat so they are little bit larger than my other version. I prefer to use the used caps because they are readily available and also it is a way to recycle/reuse these caps which usually just end up squashed on the concrete. Of course, you can use new caps purchased from a home brew supply company if you prefer. I think these pendants would make wonderful gifts for the special girls and women in your life as you can customize the look of these pendants and with Christmas coming up you can make up a bunch of these in no time!
What You Need:
- Old Bottle caps in good condtition
- Image/Artwork
- Mod Podge
- Paint Brush
- Dremel with Small Drill Bit or Hammer and Nail
- Resin or Diamond Glaze (optional)
- Clear Spray Sealer
- Fingernail file or Sandpaper
- Paint (optional)
- Jumpring
Step #1- Clean, Bend Edges of Caps and Drill A Hole
Clean your used bottle caps throughly and let dry. Once your caps are all clean and dry, take a Dremel with a small drill bit or a hammer and nail and make a hole on the side of the cap. This will be for your jumpring. Now bend the edges of the cap outward. The way I do this is to take a pair of pliers or similar tool (I use a set of needle nose pliers) and holding the cap (I do it top facing down looking into the inside of the cap) grip the crimped edge of the cap and bend the edges outward gently going all the way around the edge of the cap. The key is to bend the edges up gently or else it can make a dent in the cap and distort the top edge of the cap and you don't want that. The key is to keep the top of the cap where the logo is as perfect and round as you can with the crimped edges bent outward-keeping it looking as neat and even as possible. Just be gentle. After you've done it a few times you'll be doing it like an old pro :0)
Step #2- Paint Your Cap and Seal
Painting is optional so if you choose not to paint go on to step 3. If you do want to paint, now is the time. Take your cap and paint the front and back of the cap. I like to use spray paint because it is quick and covers very well but since I do not have all the colors I would like in spray paint I also use acrylic paint. I use Folk Art brand- just make sure it is for all paintable surfaces otherwise it will tend to chip off easily. I usually put a couple of coats and then seal with a good clear spray sealer. This will help protect the paint. After you have painted and sealed your cap, take a fingernail file or sandpaper and sand the very top of the cap where you will be mounting your image to roughen it up a bit. The roughed up surface will help adhere the image to the cap.
NOTE: I noticed that some of the seals on my caps remained tacky when I painted with spray paint so I took a little bit of clear nail polish and went over the seal and let it dry before I sprayed with the sealer to remove the tackiness- it was something in the spray paint that reacted with the plastic seal because I did not have any tackiness with the acrylic paint. So just be aware of that in case you are using spray paint. Also, if you prefer you can just remove the seals before you paint them by pouring a tiny bit of acetone inside the cap and soaking the seal in it for an hour. You should then be able to peal the seal right out of the cap. You can get bottles of pure acetone at beauty supply stores or even Walmart located with the fingernail polish removers. Just make sure it is 100% acetone.
Step #3- Cut Out and Mount Your Image
Time to add your image to your pendant! This is my favorite part.. You can use anything you want.. whether it be a small picture, scrapbook paper in your favorite pattern, your own artwork or even a little collage. The image should be cut out in a circle- about 1 inch. Just enough to cover the top of cap. They have 1inch round paper punches that are the perfect size for this. I use a scalloped edged round punch for mine.. Another thing you can do if you don't have a round paper punch is trace a quarter around your image and then cut it out.
Once you have your circle image cut out, apply mod podge to the back side of your image and adhere it to the top of the cap making sure the entire image and all edges are adhered to cap. After it dries go over the top of the image with a couple of coats of mod podge making sure to cover the entire image and all edges. This will help seal your image and keep it from getting damaged.
You can stop here and your pendant will look amazing- just add your jumpring and put it on a cord!
There is one more thing you can do to make your pendant look even more fabulous! I usually put a coat of resin or diamond glaze (or something similar) over the image as well. This adds extra protection and will give a beautiful glass-like finish to your pendant.
Step #4: Apply Resin or Diamond Glaze
I prefer resin because I think in the long run it is more durable and I love the domed affect that you get with it. I use Envirotex Lite and have never had a problem. It doesn't have a harsh smell and it is really easy to use. You can get this at Michaels or Hobby Lobby. I'm sure other places carry it as well. If you don't have resin you can apply Diamond Glaze or something similar. Diamond Glaze is a dimensional adhesive. It dries very clear and it has a very shiny glass like surface though not quite as durable as resin in my opinion.
If you are applying resin, make sure to follow the instructions very closely. After the resin is all mixed up take a wooden stick or small plastic spoon and let a small amount drip onto the top of the cap.. after you have dripped a small amount let it sit and it will spread toward the edges and level itself out over the top of the cap. It is self-leveling. If you feel like you don't have enough to cover the top go ahead and drop a bit more on the cap.. just don't use too much. The goal is to get it to cover the top of the cap without running over the edges. If it does go over the edges just wipe off the drips with a paper towel. If your resin has alot of bubbles in it, take a straw and blow gently over the top of the resin and all the bubbles will pop. Once you are satisfied with the application of resin put a plastic box or something over the cap to protect it from dust and things in the air. The pendant should be dry enough to move after 24 hours but it takes about 72 hours for the resin to cure completely.
If you are using Diamond Glaze just simply put a thick even layer of the glaze over the top of the image. It tends to get bubbles sometimes so keep an eye on it for a bit and pop any bubbles with a dry paint brush. Right out of the bottle it has a cloudy look but It will dry clear with a glass-like finish. It should be completely dry in 24 hours.
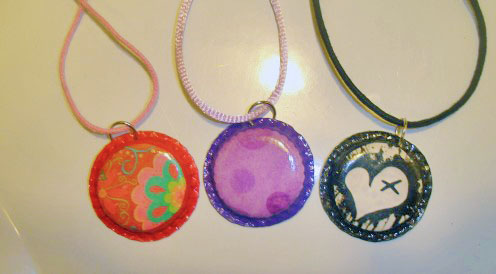
Now all you have to do is add your jumpring and your necklace cord!
Are you interested in making a bottle cap pendant with the image inside the cap? Visit my other bottle cap pendant tutorial!